

Animating Pie Slices using a custom CALayer
It’s going to be a rather long post, so if you want to jump around, here are your way points:
With a powerful platform like iOS, it is not surprising to have a variety of options for drawing. Picking the one that works best may sometimes require a bit of experimentation. Case in point: a pie chart whose slices had to be animated as the values changed over time. In this blog post, I would like to take you through various stages of my design process before I ended up with something close to what I wanted. So lets get started.
First steps
Lets quickly look at the array of options that we have for building up graphics in iOS:
- Use the standard Views and Controls in
UIKitand create a view hierarchy - Use the
UIAppearanceprotocol to customize standard controls - Use
UIWebViewand render some complex layouts in HTML + JS. This is a surprisingly viable option for certain kinds of views - Use
UIImageViewand show a pre-rendered image. This is sometimes the best way to show a complex graphic instead of building up a series of vectors. Images can be used more liberally in iOS and many of the standard controls even accept an image as parameter. - Create a custom
UIViewand overridedrawRect:. This is like the chain-saw in our toolbelt. Used wisely it can clear dense forests of UI challenges. - Apply masking (a.k.a. clipping) on vector graphics or images. Masking is often underrated in most toolkits but it does come very handy.
- Use Core Animation Layers:
CALayerwith shadows, cornerRadius or masks. UseCAGradientLayer,CAShapeLayerorCATiledLayer - Create a custom
UIViewand render aCALayerhierarchy
As you can see there are several ways in which we can create an interactive UI control. Each of these options sit at a different level of abstraction in the UI stack. Choosing the right combination can thus be an interesting thought-exercise. As one gains more experience, picking the right combination will become more obvious and also be a lot faster.
A path for the slice
With that quick overview of the UI options in iOS, lets get back to our problem of building an animated Pie Chart. Since we are talking about animation, it is natural to think about Core Animation and CALayers. In fact, the choice of a CAShapeLayer with a path for the pie-slice is a good first step. Using the UIBezierPath class, it is easier than using a bunch of CGPathXXX calls.
-(CAShapeLayer *)createPieSlice {
	CAShapeLayer *slice = [CAShapeLayer layer];
	slice.fillColor = [UIColor redColor].CGColor;
	slice.strokeColor = [UIColor blackColor].CGColor;
	slice.lineWidth = 3.0;

	CGFloat angle = DEG2RAD(-60.0);
	CGPoint center = CGPointMake(100.0, 100.0);
	CGFloat radius = 100.0;

	UIBezierPath *piePath = [UIBezierPath bezierPath];
	[piePath moveToPoint:center];

	[piePath addLineToPoint:CGPointMake(center.x + radius * cosf(angle), center.y + radius * sinf(angle))];

	[piePath addArcWithCenter:center radius:radius startAngle:angle endAngle:DEG2RAD(60.0) clockwise:YES];

//	[piePath addLineToPoint:center];
	[piePath closePath]; // this will automatically add a straight line to the center
	slice.path = piePath.CGPath;

	return slice;
}- The path consists of two radial lines originating at the center of the cirlce, with an arc between the end-points of the lines
- The angles in the call to
addArcWithCenteruse the following unit-coordinate system:

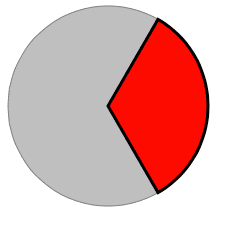
DEG2RADis a simple macro that converts from degrees to radians- When rendered the pie slice looks like below. The background gray circle was added to put the slice in the context of the whole circle.
Animating the pie-slice
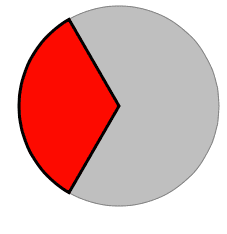
Now that we know how to render a pie-slice, we can start looking at animating it. When the angle of the pie-slice changes we would like to smoothly animate to the new slice. Effectively the pie-slice will grow or shrink in size, like a radial fan of cards spreading or collapsing. This can be considered as a change in the path of the CAShapeLayer. Since CAShapeLayer naturally animates changes to the path property, we can give it a shot and see if that works. So, let’s say, we want to animate from the current slice to a horizontally-flipped slice, like so:
To achieve that, lets refactor the code a bit and move the path creation into its own method.
-(CGPathRef)createPieSliceWithCenter:(CGPoint)center
				radius:(CGFloat)radius
				startAngle:(CGFloat)degStartAngle
				endAngle:(CGFloat)degEndAngle {

	UIBezierPath *piePath = [UIBezierPath bezierPath];
	[piePath moveToPoint:center];

	[piePath addLineToPoint:CGPointMake(center.x + radius * cosf(DEG2RAD(degStartAngle)), center.y + radius * sinf(DEG2RAD(degStartAngle)))];

	[piePath addArcWithCenter:center radius:radius startAngle:DEG2RAD(degStartAngle) endAngle:DEG2RAD(degEndAngle) clockwise:YES];

	//	[piePath addLineToPoint:center];
	[piePath closePath]; // this will automatically add a straight line to the center

	return piePath.CGPath;
}

-(CAShapeLayer *)createPieSlice {

	CGPoint center = CGPointMake(100.0, 100.0);
	CGFloat radius = 100.0;

	CGPathRef fromPath = [self createPieSliceWithCenter:center radius:radius startAngle:-60.0 endAngle:60.0];
	CGPathRef toPath = [self createPieSliceWithCenter:center radius:radius startAngle:120.0 endAngle:-120.0];

	CAShapeLayer *slice = [CAShapeLayer layer];
	slice.fillColor = [UIColor redColor].CGColor;
	slice.strokeColor = [UIColor blackColor].CGColor;
	slice.lineWidth = 3.0;
	slice.path = fromPath;


	CABasicAnimation *anim = [CABasicAnimation animationWithKeyPath:@"path"];
	anim.duration = 1.0;

	// flip the path
	anim.fromValue = (__bridge id)fromPath;
	anim.toValue = (__bridge id)toPath;
	anim.removedOnCompletion = NO;
	anim.fillMode = kCAFillModeForwards;

	[slice addAnimation:anim forKey:nil];
	return slice;
}
In the refactored code, createPieSlice: just calls the createPieSliceWithCenter:radius:startAngle:endAngle function for the from and to-paths and sets up an animation between these two paths. In action, this looks like so:
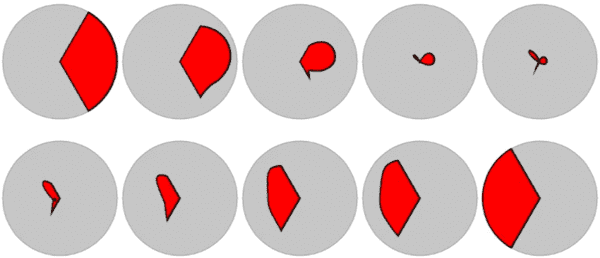
Yikes! That is definitely not what we expected. CAShapeLayer is morphing the paths rather than growing or shrinking the pie slices. Of course, this means we need to adopt more stricter measures for animating the pie slices.
Raising the level of abstraction
Clearly CAShapeLayer doesn’t understand pie-slices and has no clue about how to animate a slice in a natural manner. We definitely need more control around how the pie slice changes. Luckily we have an API that gives a hint at the kind of abstraction we need: a pie slice described in terms of {startAngle, endAngle}. This way our parameters are more strict and not as flexible as the points of a bezier path. By making these parameters animatable, we should be able to animate the pie-slices just the way we want.
Applying this idea to our previous animation example, the path can be said to be changing from {-60.0, 60.0} to {120.0, -120.0}. By animating the startAngle and endAngle, we should be able to make the animation more natural. In general, if you find yourself tackling a tricky problem like this, take a step back and check if you are at the right level of abstraction.
Custom CALayer, the PieSliceLayer
If a CAShapeLayer can’t do it, we probably need our own custom CALayer. Let’s call it the PieSliceLayer and give it two properties: … you guessed it… startAngle and endAngle. Any change to these properties will cause the custom layer to redraw and also animate the change. This requires following a few standard procedures as prescribed by Core Animation Framework.
- Firstly don’t
@synthesizethe animatable properties and instead mark them as@dynamic. This is required because Core Animation does some magic under the hood to track changes to these properties and call appropriate methods on your layer.
#import <QuartzCore/QuartzCore.h>

@interface PieSliceLayer : CALayer


@property (nonatomic) CGFloat startAngle;
@property (nonatomic) CGFloat endAngle;

@property (nonatomic, strong) UIColor *fillColor;
@property (nonatomic) CGFloat strokeWidth;
@property (nonatomic, strong) UIColor *strokeColor;
@end
#import "PieSliceLayer.h"
@implementation PieSliceLayer
@dynamic startAngle, endAngle;
@synthesize fillColor, strokeColor, strokeWidth;
...
@end-
Override
actionForKey:and return aCAAnimationthat prepares the animation for that property. In our case, we will return an animation for thestartAngleandendAngleproperties. -
Override
initWithLayer:to copy the properties into the new layer. This method gets called for each frame of animation. Core Animation makes a copy of thepresentationLayerfor each frame of the animation. By overriding this method we make sure our custom properties are correctly transferred to the copied-layer. -
Finally we also need to override
needsDisplayForKey:to tell Core Animation that changes to ourstartAngleandendAngleproperties will require a redraw.
-(id<CAAction>)actionForKey:(NSString *)event {
	if ([event isEqualToString:@"startAngle"] ||
		[event isEqualToString:@"endAngle"]) {
		return [self makeAnimationForKey:event];
	}

	return [super actionForKey:event];
}

- (id)initWithLayer:(id)layer {
	if (self = [super initWithLayer:layer]) {
		if ([layer isKindOfClass:[PieSliceLayer class]]) {
			PieSliceLayer *other = (PieSliceLayer *)layer;
			self.startAngle = other.startAngle;
			self.endAngle = other.endAngle;
			self.fillColor = other.fillColor;

			self.strokeColor = other.strokeColor;
			self.strokeWidth = other.strokeWidth;
		}
	}

	return self;
}

+ (BOOL)needsDisplayForKey:(NSString *)key {
	if ([key isEqualToString:@"startAngle"] || [key isEqualToString:@"endAngle"]) {
		return YES;
	}

	return [super needsDisplayForKey:key];
}
With that we now have a custom PieSliceLayer that animates changes to the angle-properties. However the layer does not display any visual content. For this we will override the drawInContext: method.
Rendering the PieSliceLayer
Here we draw the slice just the way we did earlier. Instead of using UIBezierPath, we now go with the Core Graphics calls. Since the startAngle and endAngle properties are animatable and also marked for redraw, this layer will be rendered each frame of the animation. This will give us the desired animation when the slice changes its inscribed angle.
-(void)drawInContext:(CGContextRef)ctx {

	// Create the path
	CGPoint center = CGPointMake(self.bounds.size.width/2, self.bounds.size.height/2);
	CGFloat radius = MIN(center.x, center.y);

	CGContextBeginPath(ctx);
	CGContextMoveToPoint(ctx, center.x, center.y);

	CGPoint p1 = CGPointMake(center.x + radius * cosf(self.startAngle), center.y + radius * sinf(self.startAngle));
	CGContextAddLineToPoint(ctx, p1.x, p1.y);

	int clockwise = self.startAngle > self.endAngle;
	CGContextAddArc(ctx, center.x, center.y, radius, self.startAngle, self.endAngle, clockwise);

	CGContextClosePath(ctx);

	// Color it
	CGContextSetFillColorWithColor(ctx, self.fillColor.CGColor);
	CGContextSetStrokeColorWithColor(ctx, self.strokeColor.CGColor);
	CGContextSetLineWidth(ctx, self.strokeWidth);

	CGContextDrawPath(ctx, kCGPathFillStroke);
}
It all comes together in PieView
When we originally started, we wanted to build a Pie Chart that animated changes to its slices. After some speed bumps we got to a stage where a single slice could be described in terms of start/end angles and have any changes animated.
If we can do one slice, we can do multiples! A Pie Chart is a visualization for an array of numbers, where each numbers is an instance of the PieSliceLayer. The size of a slice depends on its relative value within the array. An easy way to get the relative value is to normalize the array and use the normal value [0, 1] to arrive at the angle of the slice, ie. normal * 2 * M_PI. For example, if the normal value is 0.5, the angle of the slice will be M_PI or 180°.
Managing the slices
The PieView manages the slices in a way that makes sense for a Pie Chart. Given an array of numbers, the PieView takes care of normalizing the numbers, creating the right number of slices and positioning them correctly in the pie. Since PieView will be a subclass of UIView, we also have the option to introduce some touch interaction later. Having a UIView that hosts a bunch of CALayers is a common approach when dealing with an interactive element like the PieChart.
The PieView exposes a sliceValues property which is an NSArray of numbers. When this property changes, PieView manages the CRUD around the PieSliceLayers. If there are more numbers than slices, PieView will add the missing slices. If there are fewer numbers than slices, it removes the excess. All the existing slices are updated with the new numbers. All of this happens in the updateSlices method.
#import <UIKit/UIKit.h>

@interface PieView : UIView

@property (nonatomic, strong) NSArray *sliceValues;

-(id)initWithSliceValues:(NSArray *)sliceValues;
@end
#import "PieView.h"
#import "PieSliceLayer.h"
#import <QuartzCore/QuartzCore.h>
#define DEG2RAD(angle) angle*M_PI/180.0
@interface PieView() {
NSMutableArray *_normalizedValues;
CALayer *_containerLayer;
}
-(void)updateSlices;
@end
@implementation PieView
@synthesize sliceValues = _sliceValues;
-(void)doInitialSetup {
_containerLayer = [CALayer layer];
[self.layer addSublayer:_containerLayer];
}
- (id)initWithFrame:(CGRect)frame
{
self = [super initWithFrame:frame];
if (self) {
[self doInitialSetup];
}
return self;
}
-(id)initWithCoder:(NSCoder *)aDecoder {
if (self = [super initWithCoder:aDecoder]) {
[self doInitialSetup];
}
return self;
}
-(id)initWithSliceValues:(NSArray *)sliceValues {
if (self) {
[self doInitialSetup];
self.sliceValues = sliceValues;
}
return self;
}
-(void)setSliceValues:(NSArray *)sliceValues {
_sliceValues = sliceValues;
_normalizedValues = [NSMutableArray array];
if (sliceValues) {
// total
CGFloat total = 0.0;
for (NSNumber *num in sliceValues) {
total += num.floatValue;
}
// normalize
for (NSNumber *num in sliceValues) {
[_normalizedValues addObject:[NSNumber numberWithFloat:num.floatValue/total]];
}
}
[self updateSlices];
}
-(void)updateSlices {
_containerLayer.frame = self.bounds;
// Adjust number of slices
if (_normalizedValues.count > _containerLayer.sublayers.count) {
int count = _normalizedValues.count - _containerLayer.sublayers.count;
for (int i = 0; i < count; i++) {
PieSliceLayer *slice = [PieSliceLayer layer];
slice.strokeColor = [UIColor colorWithWhite:0.25 alpha:1.0];
slice.strokeWidth = 0.5;
slice.frame = self.bounds;
[_containerLayer addSublayer:slice];
}
}
else if (_normalizedValues.count < _containerLayer.sublayers.count) {
int count = _containerLayer.sublayers.count - _normalizedValues.count;
for (int i = 0; i < count; i++) {
[[_containerLayer.sublayers objectAtIndex:0] removeFromSuperlayer];
}
}
// Set the angles on the slices
CGFloat startAngle = 0.0;
int index = 0;
CGFloat count = _normalizedValues.count;
for (NSNumber *num in _normalizedValues) {
CGFloat angle = num.floatValue * 2 * M_PI;
NSLog(@"Angle = %f", angle);
PieSliceLayer *slice = [_containerLayer.sublayers objectAtIndex:index];
slice.fillColor = [UIColor colorWithHue:index/count saturation:0.5 brightness:0.75 alpha:1.0];
slice.startAngle = startAngle;
slice.endAngle = startAngle + angle;
startAngle += angle;
index++;
hue += num.floatValue;
}
}
@endThere is one thing we didn’t do yet, which is enabling some touch interaction. I’ll leave that as a reader exercise for now.
Demo and Source code
With all that reading you did so far, your eyes are probably thirsty for some visuals. Well, treat yourself with the YouTube video and the github source on the side.