

Progressive reveal animations in SVG using a <svg:clipPath>
In the previous post on “Building a tree diagram in D3.js” we saw how the D3.js library could be used to render tree diagrams. If you haven’t read that post yet, I would encourage reading it as we will be expanding on it in this post.
Now that we have a nice tree diagram of a hierarchy, it would be good to build in some interactions. After all, given a tree, one would certainly like to click on the nodes and see something happening. Lets do that by animating the path from the clicked node all the way to the root. To pull this off, we need three things:
- A set of all nodes from the clicked node to the root
- A set of all links (paths) from the clicked node back to the root
- A revealing animation that progressively draws the paths from the clicked node to the root
The first two parts are easy and we have already seen that in the previous post. d3.layout.tree has a method called nodes() that gives us the collection of the nodes with their (x, y) locations and links() gives all links between the nodes. We will use the nodes collection to traverse the parent chain from the clicked node all the way to the root. Once we have the nodes along the parent chain, we use that to select the links that lie between each of these nodes. With the links between the nodes, the last part is to animate them into view. The animation part is the most interesting and also the topic of this post.
Animating the path to root
Now that we have the links between the nodes, the next step is to simply draw the SVG Path segments connecting these nodes. We will keep these path segments in its own SVG Group for easier manipulation. To animate these paths, there are two different approaches we can take:
- We can draw the path progressively by setting the SVG Path data in each time interval of the animation OR
- We can use a clipping path for the SVG Group and grow the bounds of the path from right to left. As the clipping path grows in size, it reveals more of the underlying group (which contains the paths), thus animating the path from the clicked node to root. This technique can even be used for progressively revealing complicated graphics.
I am adopting the later approach for this post. To set this up, we first need to add a <clipPath> node to the <svg>. We will also give it an id, so we can reference it later. This clip-path is going to be a <rect> since that is all we need. The code below sets up the clipping path for the <group> that contains the paths to root. The variable animGroupholds the reference to this group.
var svgRoot = d3
    .select(containerName)
    .append('svg:svg')
    .attr('width', size.width)
    .attr('height', size.height);

// Add the clipping path
svgRoot
    .append('svg:clipPath')
    .attr('id', 'clipper')
    .append('svg:rect')
    .attr('id', 'clip-rect');

var layoutRoot = svgRoot
    .append('svg:g')
    .attr('class', 'container')
    .attr('transform', 'translate(' + maxLabelLength + ',0)');

// set the clipping path
var animGroup = layoutRoot.append('svg:g').attr('clip-path', 'url(#clipper)');
Note that we have also set up an “id” for the <rect> (#clip-rect), which we will use later for animating the clipping path. The “click” handler To kick off the animation, we will detect a click happening on a node and then draw the path from the clicked node to the root. In the code below we do this using d3.js’ event API: the on(“event”) method.
function setupMouseEvents() {
    ui.nodeGroup
        .on('mouseover', function(d, i) {
            d3.select(this)
                .select('circle')
                .classed('hover', true);
        })
        .on('mouseout', function(d, i) {
            d3.select(this)
                .select('circle')
                .classed('hover', false);
        })
        .on('click', function(nd, i) {
            // Walk parent chain
            var ancestors = [];
            var parent = nd;
            while (!_.isUndefined(parent)) {
                ancestors.push(parent);
                parent = parent.parent;
            }

            // Get the matched links
            var matchedLinks = [];
            ui.linkGroup
                .selectAll('path.link')
                .filter(function(d, i) {
                    return _.any(ancestors, function(p) {
                        return p === d.target;
                    });
                })
                .each(function(d) {
                    matchedLinks.push(d);
                });

            animateParentChain(matchedLinks);
        });
}
In the the “click” event handler, we traverse the parent links back to the root and record all the ancestors in the path. We then filter all the rendered links (<path>) by picking only the ones that contain the nodes in the ancestors list. This becomes our list of matched links. Using these links we can now finally handle the animation that progressively reveals the emboldened path back to the root.
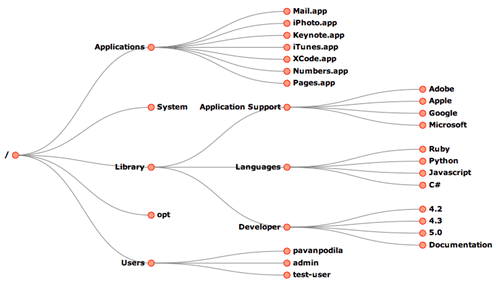
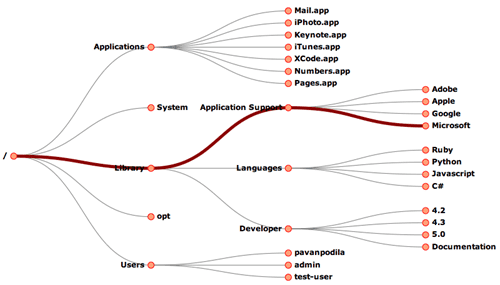
Back to my Mac root
Since we have all the links that take us from the clicked
node to the root, we apply the same method that we used earlier to
render the links. Using d3.diagonal(), we can generate the <path> data
between the ancestor nodes. Only this time, the path will be rendered
with a class set to “selected”, which emboldens the route back to
the root.
function animateParentChain(links) {
    var linkRenderer = d3.svg.diagonal().projection(function(d) {
        return [d.y, d.x];
    });

    // Links
    ui.animGroup
        .selectAll('path.selected')
        .data([])
        .exit()
        .remove();

    ui.animGroup
        .selectAll('path.selected')
        .data(links)
        .enter()
        .append('svg:path')
        .attr('class', 'selected')
        .attr('d', linkRenderer);

    // Animate the clipping path
    var overlayBox = ui.svgRoot.node().getBBox();

    ui.svgRoot
        .select('#clip-rect')
        .attr('x', overlayBox.x + overlayBox.width)
        .attr('y', overlayBox.y)
        .attr('width', 0)
        .attr('height', overlayBox.height)
        .transition()
        .duration(500)
        .attr('x', overlayBox.x)
        .attr('width', overlayBox.width);
}
Once the paths have been rendered, we set the clipping path starting with a zero-width <rect>, which is then animated to the full width of the tree-diagram. It is in this animation of the clipping-path where you will see the path drawing itself out, giving us the final effect we were looking for!
Demo
You can see this code in action